
In Windows 10, the CPU divides power to all the running programs equally. But we can set an app to high priority in Windows 10. This will boost the performance of that program as the CPU will give more power to the program.
In this guide, we will see how we can set an app to high priority in Windows 10. There are multiple methods to do this process. The easiest method is using task manager but this can also be done using the Command Prompt and PowerShell.
Let’s get into it.
Why & When You Should Change the Priority Level of an App
Windows assigns a priority level to all apps by default. It depends on the importance of the app. You shouldn’t worry about this but if you still want to provide high priority to any app, you can do that.
Windows provide six different levels of priority: real-time, High, Above normal, normal below normal, and low. If you work on any app or use any app regularly and want to give more importance and CPU usage to that app, you can set that to high-level priority in Windows 10.
How to Set an App to High Priority in Windows 10
A task manager comes useful when any program does not respond. As the task manager can close any program, also it can provide high priority to any app.
1. Change Priority Using Task Manager
Here’s how you can set an app to high priority in Windows 10:
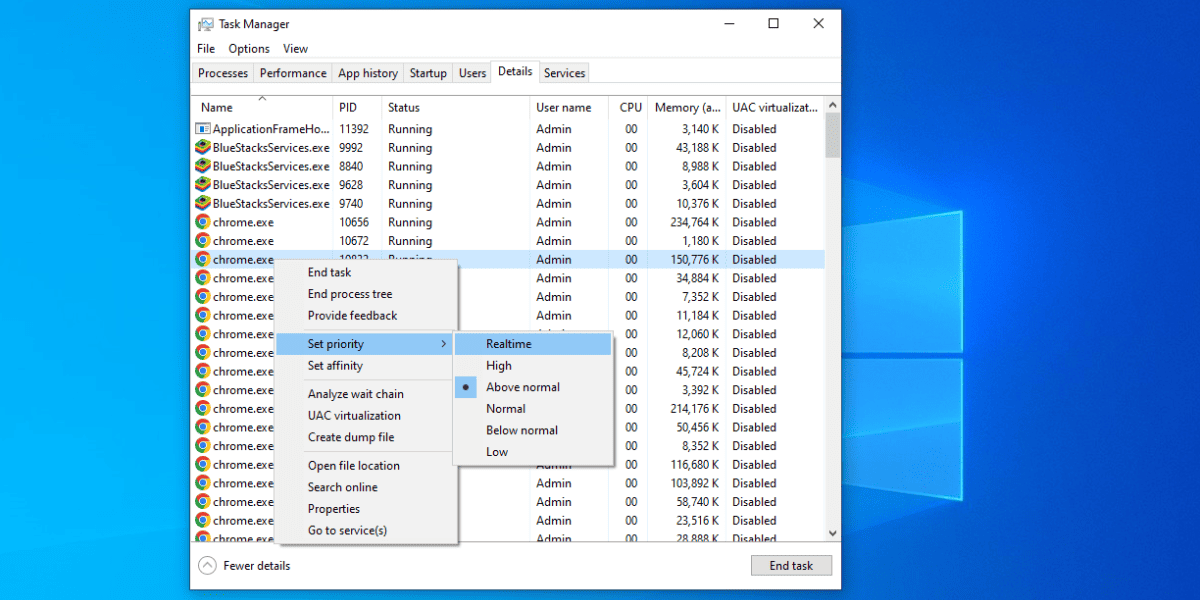
- Press CTRL + Shift + Esc from the keyboard to open the task manager in Windows 10.
- Now, select the details tab from the list of tabs. This will show all the programs on the computer.
- Right-click on the .exe file of your process and select Set Priority.
- Select the above normal or High option from the available options according to your requirement to increase the priority of your app.
- A dialog box will appear to confirm the selection. Select the Change Priority from the options.
After confirming, the priority of that app will be high in Windows 10. This is the easiest and simple way by far to increase the priority of any app in Windows 10.
Related:
How Many Passes Defrag Windows 10
2. Change Priority using Command Prompt
If you are a techy guy who is familiar with the command prompt and wants to use it to set an app to high priority in Windows 10 then follow the below steps. Make sure the program is running before head before increasing its priority.
Follow the below procedure to complete the process:
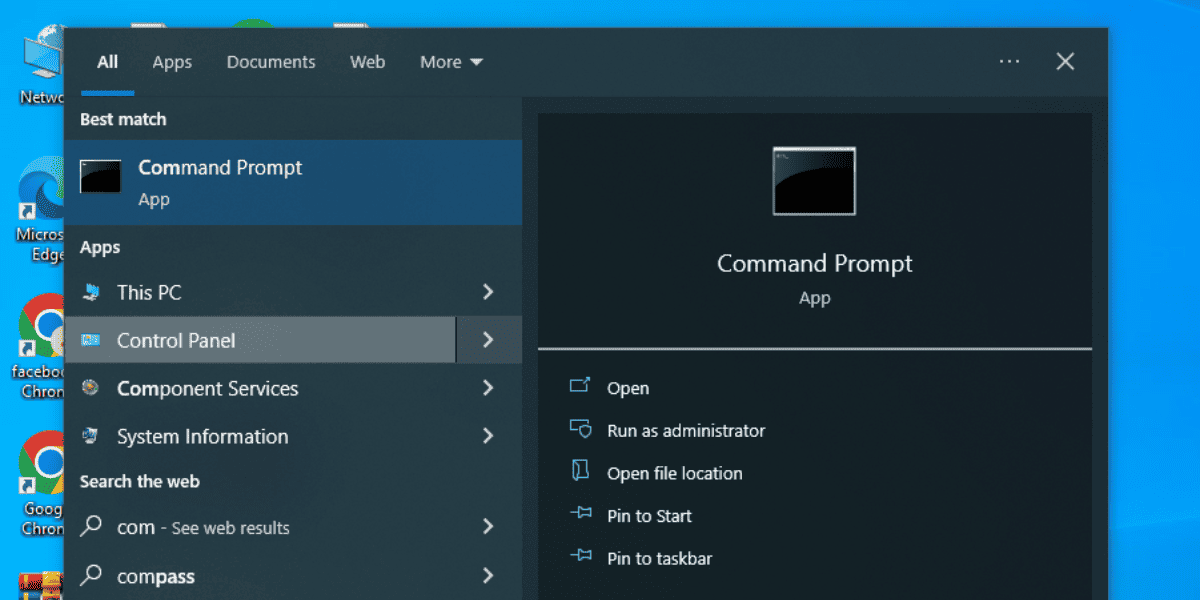
- Hit the Windows key + S and search the Command Prompt.
- Right-click on the Command Prompt option and select Run as Administrator.
- When Command Prompt starts, paste the below command.
- wmic process where name=”Nameofprocess.exe” CALL setpriority “LevelofPriority”.
You need to change the “NamofProcess” with the process name and “LevelofPriority” with the priority level which you want to give to the desired process.
3. Change Priority using PowerShell
Similar to the command prompt, we can increase or decrease the priority of any app in PowerShell. Follow the below steps to perform the procedure using PowerShell.
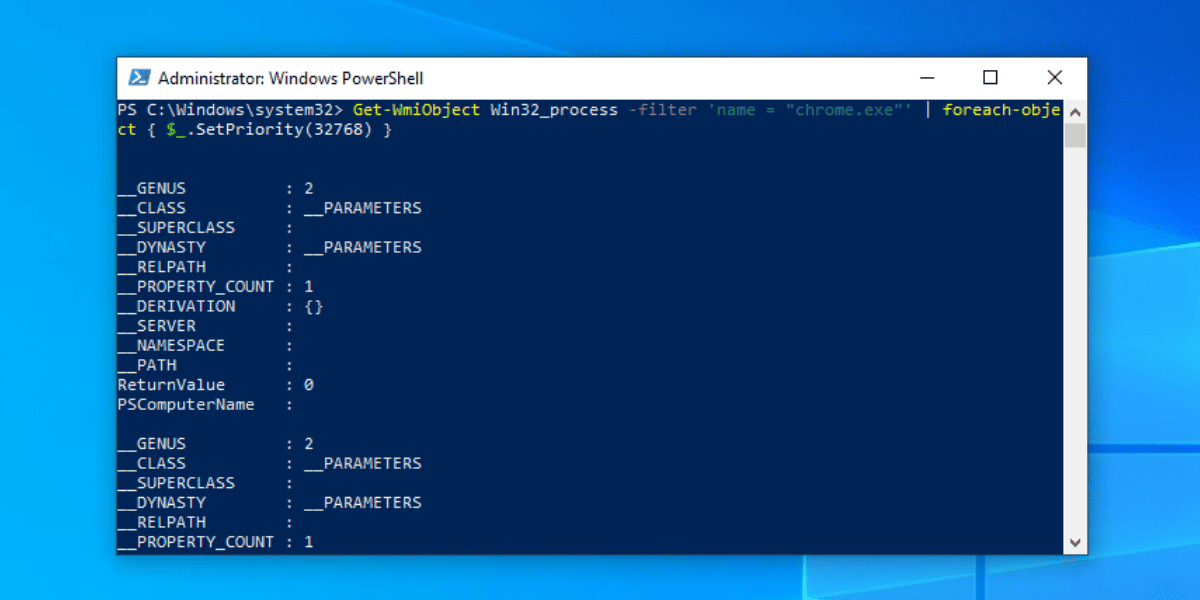
- Press the Windows Key + X from the keyboard.
- Now, select Windows PowerShell (Admin) from the list of options.
- Run the following command, when the PowerShell is opened completely.
- Get-WmiObject Win32_process -filter ‘name = “chrome.exe”‘ | foreach-object { $_.SetPriority(32768) }
Make sure you change the “NameofProcess” with the process name and PriorityLevelID with the ID of the level which you want to give to the process. The IDs of the priority are as follows:
- RealTime: 256
- High: 128
- Above Normal: 32768
- Normal: 32
- Below Normal: 16384
- low: 64
So for example, if you want to give High priority of Chrome the command will be as follows:
Get-WmiObject Win32_process -filter ‘name = “chrome.exe”‘ | foreach-object { $_.SetPriority(32768) }
Related:
How to Delete Music Creation from Mac
Start the Application with any priority level using CMD
We can start any program with desired priority level using the command prompt. Here’s how we can do this:
- Open the Command Prompt as written in the first method.
- Now, run the below command in the command prompt.
- start “/HIGH” C:\Program Files\Chrome\chrome.exe”
Make sure you write the correct path of the file and also the correct priority level for that program. The above command will open the chrome with a High priority level. You can try this on any program.
Conclusion
Now, we know 3 different methods to set an app to high priority in Windows 10. The first one is using the task manager and the second is using the command prompt and the third one is using the PowerShell. The first method is the easiest method to do this.