
The cursor on Mac can be distracting during tasks like gaming or reading. Discover how to hide the cursor on Mac effortlessly, either through built-in keyboard shortcuts or utilities like Cursorcerer for a seamless experience.
Well, the process is quite simple, and we will walk you through it in this guide. So follow along and continue working without having the cursor distract you.
Hide The Cursor On Mac With a Keyboard Shortcut
You can hide the cursor on Mac using keyboard shortcuts like F8 or by installing utilities like Cursorcerer. These tools offer quick solutions to eliminate cursor distractions and enhance focus while using your Mac.
Follow the below steps to complete the procedure.
- Switch to the app in which you want to hide the cursor.
- Press the F8 key on your keyboard.
- You might have to press the fn + F8 key command depending on your settings.
- The cursor should be gone now.
- Move the trackpad or mouse to make the cursor reappear.
In web browsers like Firefox and Safari, you can make the cursor disappear by just pressing the Esc key. It will be revealed again as soon as you move the trackpad or mouse.
This method may not work on certain Mac devices, so you can also install the free utility tool called Cursorcerer to hide the cursor on mac.
Related:
How to Uninstall Tor Browser on Windows 10 and Mac
Hide The Cursor On Mac With Cursorcerer
Cursorcerer is installed as a preset in your Mac’s System Preferences. Just download and run it, then press the keyboard shortcut Option + Ctrl + K. This should hide the cursor on your mac in any application without any interference.
If for some reason, the shortcut is not working, then you can also change it. Just follow these steps:
- On the top-left corner of your screen, click on the Apple icon.
- From the drop-down menu, select System Preferences.
- In System Preferences, go to the app’s Preference Panel.
- Now change the keyboard shortcut and press Set.
- You can also select a time interval after which the idle cursor will automatically hide from the slider.
- Press the “Always show cursor if moved” checkbox if you want the cursor to reappear after you move the trackpad or mouse.
Cursorcerer works like a charm if you want to hide the cursor on macOS, and you can configure it according to your liking for the most distraction-free experience.
There are certain tips and warnings that you should be aware of before hiding the cursor on Mac. So let’s go over them.
Tips and Warnings
- A hidden cursor does not mean that your mouse will lose its left-click or right-click functionalities. These buttons will work just the same.
- Before hiding your mouse’s cursor, make sure it is away from any critical buttons to prevent accidental clicks on them.
- Instead of using your mouse and revealing your hidden cursor, you can use your trackpad’s gestures to perform pretty much everything.
- Cursorcerer’s auto-hide feature works really great in hiding idle mouse cursors. So you can make use of that.
Related:
How to Run Steam Games as Administrator on Windows 10
How to Change The Cursor Size On Mac
Just like hiding the cursor, changing its size is also simple on Mac. Just follow these steps:
- On the top-left corner of your screen, click on the Apple icon.
- From the drop-down menu, select System Preferences.
- In System Preferences, click on the Accessibility icon.
- In the Accessibility window, in the Vision section on the left window, select Display.
- Click on the Pointer tab.
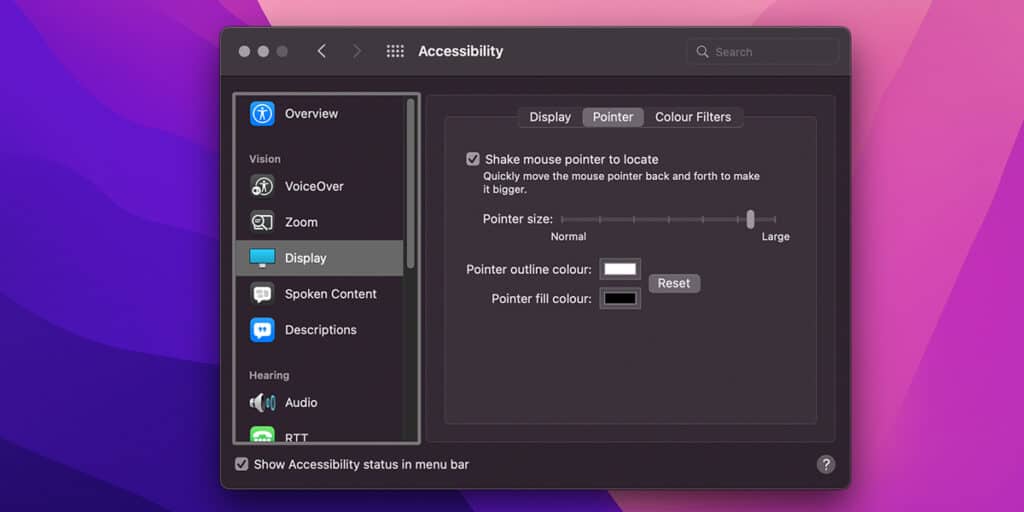
- Now move your finger on the trackpad or the mouse to drag the slider to increase or decrease the size of the pointer.
- Stop the slider once your cursor has the desired size.
How to Change The Cursor Color On Mac
Changing the color of the cursor on a Mac is just as easy as changing its size. Even the steps are similar. So follow along!
- On the top-left corner of your screen, click on the Apple icon.
- Select System Preferences from the drop down menu.
- Click on the Accessibility icon in System Preference.
- On the left window of the Accessibility settings, look for the Vision section and select Display.
- Click on the Pointer tab.
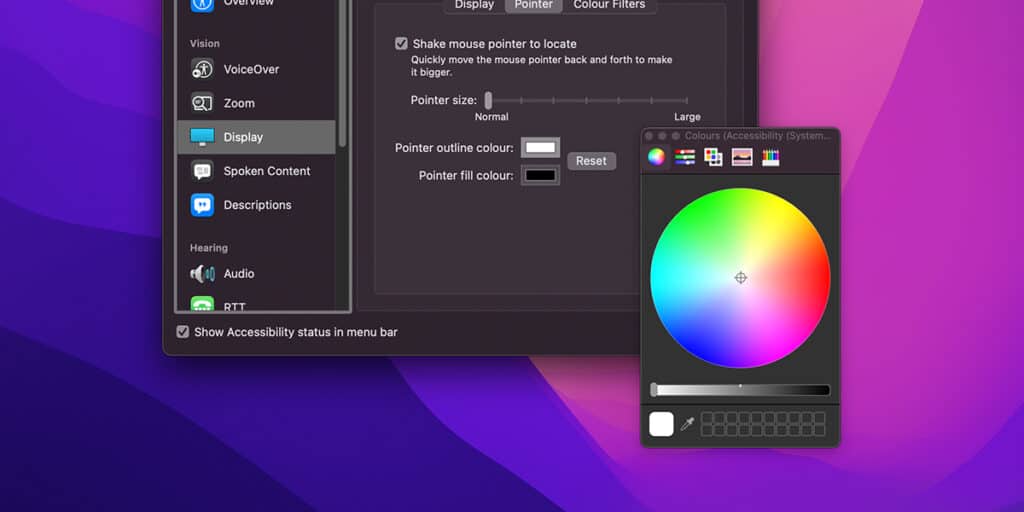
- Below the pointer size slider, there are two color settings, “Pointer outline color” and “Pointer fill color”. Next to each setting, there is a color swatch button, click on it and the colors selection palette will appear.
- Select your desired outline and fill color from the color palette.
- Click on the Reset button if you want to go back to the default white and black color.
By following these steps, you can change the pointer color on Mac, and you can also go back to the default colors.
Related:
How to Check if Something is Downloading in Background in Windows 10
How to Highlight The Mouse Cursor On Mac
There is no default option to highlight the mouse cursor on Mac. Instead, you have to download an app called Cursor Effect from the App Store. So continue reading for a step-by-step guide!
- Open the App Store from the Dock, or from the Apple icon on the top-left of your screen.
- On the left, there is a search bar, type Cursor Effect in it and press Enter.
- On the Cursor Effect page, click on Get to download the app.

- Soon the Get button will change to Install. Click on it to Install the app.
- Look at the menu bar on the top right of your screen, there should be the Cursor Effect icon. Click on it.
- Once Cursor Effect has opened, click on the Apply button to select any one of the free cursor options available.
- You may select “Launch at login” so the app is available on the menu bar at all times.
- Click on the Close button.
After following these steps, your cursor should be highlighted.