
Your Mac’s operating files and applications are stored in Macintosh HD. To prevent accidental edits, users only have read access to this volume. This means you can’t edit or delete files on this volume. This security measure makes sure that your macOS runs smoothly because all of its necessary files are stored in Macintosh HD.
Even though you can’t edit or delete these files, you can still open the Macintosh HD volume to inspect them. In this guide, we will walk you through a step-by-step process on how you can show Macintosh HD in finder and desktop.
Let’s get started.
How to Show Macintosh HD in Finder and Desktop
Here are the easiest method to show Macintosh HD in Finder and Desktop.
How to Show Macintosh HD in Finder
When it comes to organizing your Mac, nothing gives you better access to your files than the Finder. You can use it to view your applications, photos, documents and all other files. Similarly, you can also use it to delete applications from your Mac to keep it organized.
Follow these steps to show Macintosh HD on Finder:
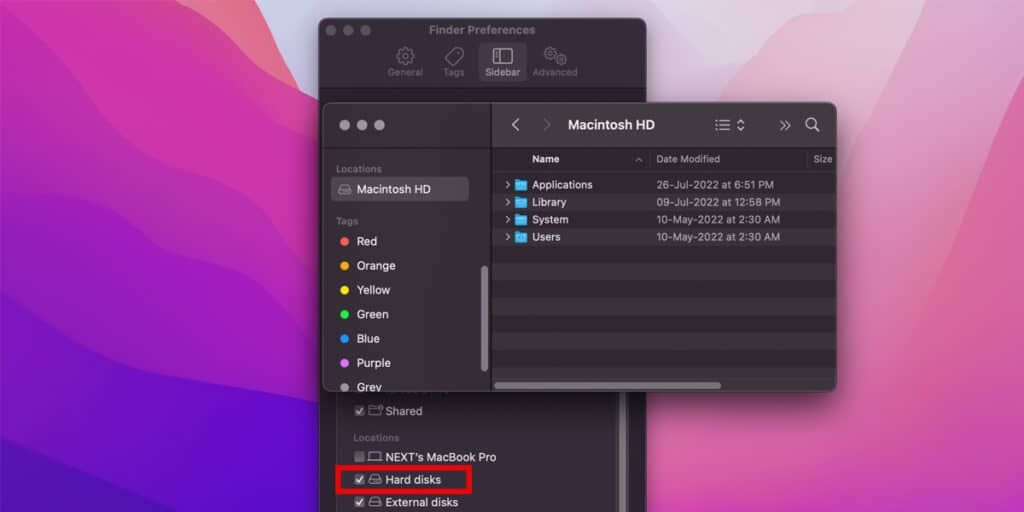
- First of all, click on the Finder menu on the top-left corner of your screen and select Preferences.
- In the Finder Preferences window, head over to the Sidebar tab.
- Under the Locations section, mark the Hard disks option to make it visible on the sidebar of the Finder.
Now head over to the Finder by pressing the Command + N keys and check the Macintosh HD volume under the Locations section on the sidebar
Related:
How to Disable Macbook Keyboard
How to Show Macintosh HD on Desktop
You should move your files and folders to the desktop if you want to access them quickly. Similarly, you can also show the Macintosh HD volume on the desktop. The steps are straight–forward and simple. Here’s how:

- First of all, click on the Finder menu on the top-left corner of your screen and select Preferences.
- In the Finder Preferences window, head over to the General tab
- Mark the Hard disks option under Show these items on the desktop. All the marked options will be visible on your Mac’s desktop.
After following these steps, the Macintosh HD volume will be visible on your Mac’s desktop. From there you can view the contents of this volume by double-clicking on it. In the above image, you can see how the macintosh HD icon looks like on Monterey version.
How to View Hidden Files in Macintosh HD
You might not find some files in Macintosh HD because they’re likely to be hidden. Follow these steps to view such hidden files:
- Open the folder you want to view the hidden files in.
- Press the Command + Shift + . (Period) keys to unhide the hidden files and folders.
- These files will be partially transparent.
- Similarly, you can hide such files by pressing Command + Shift + . (Period) keys again.
How to Show the Sidebar in Finder
The sidebar makes it easy to navigate the Finder by giving shortcuts to all sorts of files and folders. If the sidebar is not visible, then here’s how you can bring it back:
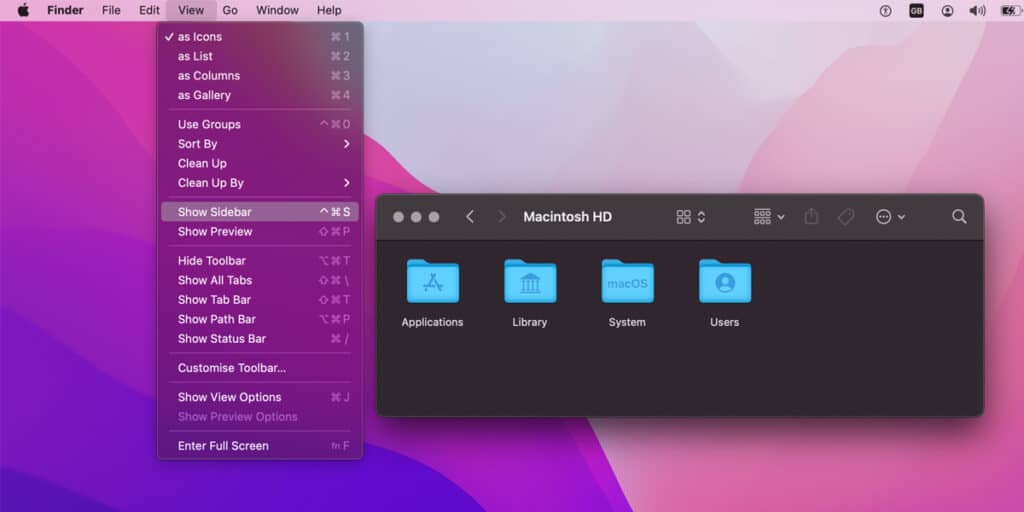
- Launch a Finder window by pressing the Command + N keys.
- Click on the View option on the menu bar.
- From the drop-down menu, select Show Sidebar.
That’s it, now the sidebar will be visible on the Finder. You can also hide it by following the same steps and selecting Show Sidebar again.
Related:
How to Delete Stickies on Mac
How to Restore Missing Drives and Folders on the Sidebar
If somehow your folders and drives are not visible on the sidebar anymore, then maybe you accidentally hid them by clicking the arrows. Follow these steps to restore them:
- Launch a Finder window by pressing the Command + N keys.
- If the Sidebar is not visible, then follow the steps we have discussed above.
- Now you will find several sections on the sidebar like Tags, iCloud, Locations, and Favorites. Hover your mouse pointer to these categories and a small arrow will appear next to their names. Click on this arrow and the categories will expand to show their contents.
- You can also hide specific categories by clicking on the downward arrow next to their names.
How to Customize your Finder Toolbar
The Finder toolbar holds many features that increases its functionality and makes it easier to navigate through different files and folders. Here’s how you can customize the Finder toolbar.
- Launch a Finder window by pressing the Command + N keys.
- Right-click on the toolbar.
- Select Customize Toolbar from the drop-down menu.
- Here you will be presented with a bunch of tools that offer different functionalities. You can drag and drop them onto the toolbar. Some of these tools are:
Quick Look: Offers you a glance of the photo or document you have selected in the Finder.
New Folder: Adds a new folder to the folder you are currently in.
Get Info: Gives detailed information of the file or folder you have selected. The information includes the path, date created, and date modified.
Path: Shows the path of the folder you are currently in. Delete: Deletes the file or folder you have selected and sends them to the Trash.
- You can also change the position of these tools on the toolbar. Just drag them to anywhere you like.
- Click on Done to save changes.
How to Tag Files and Folders in Finder
Finder tags is a convenient feature that makes it easy to quickly access particular files and folders. As the name suggests, you can tag files and folders and they will be visible under the Tags section in the sidebar. Here’s how you can use it:
- First of all, click on the Finder menu on the top-left corner of your screen.
- From the drop-down menu, select Preferences.
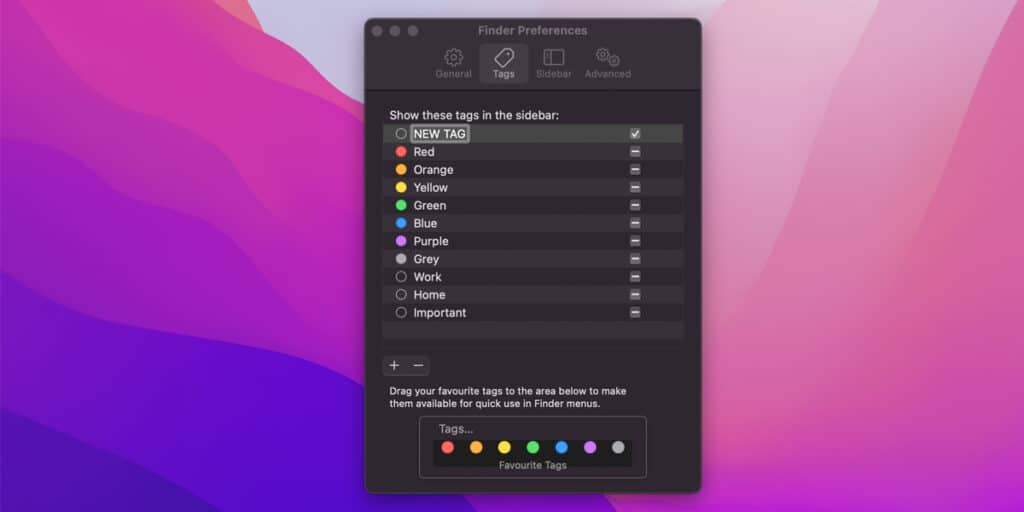
- In the Finder Preferences window, head over to the Tags tab.
- Here, click the Add (+) button to create a new tag.
- Now give the tag a relevant name and assign it a distinct color.
- Once the tag is created, make sure to mark the checkbox next to it so it’s visible in the sidebar.
- Navigate to the files and folders you want to tag.
- Right-click on the selected file, and click Tags from the drop-down menu.
- Select the newly created tag from the pop-up.
Once the files are tagged, you can access them quickly from the tags section in the sidebar.