
Apple is famous for releasing top-rated applications designed to improve users’ convenience and utility, which is why many buyers are inclined towards a Mac when it comes to purchasing a new computer.
Since these apps provide different features, it is common that they start to accumulate space on your device, which can slowly start affecting its overall performance. In this article, we will discuss one such app and see how to delete songs on iTunes Mac to free storage space.
Let’s get started.
How to Delete Songs on iTunes Mac
There are many cases where users just want to delete certain songs from their library and want to keep everything else intact. Now, if you don’t know how to delete songs on iTunes Mac, then worry not because we are going to explain a method below that you can follow to complete the task.
Well, here are the steps that you can follow to delete songs on iTunes Mac:
- Navigate to your iTunes application on Mac and Open it.
- Now on the left pane of the iTunes application, click on the respective library (like Podcasts, Books, or Music) that contains the file you want to delete.
- After this, navigate to the iTunes Menu and click on Edit.
- Now select all the songs that you want to delete.
- Once done, click on Delete. You can also do this by pressing the Delete key.
- Now you will see a pop-up window to confirm that you want to delete the files. Click Remove.
- After this, click Move to Trash on the next window.
- Finally, hold the Control key and click on your Trash to empty it.
That’s it. You have successfully deleted songs from iTunes on your Mac.
Does iTunes Take Up Storage

Although iTunes is one of the most popular applications available on the Mac to play music, it still downloads each of the playable songs onto your storage device instead of streaming it online.
Everytime a new song is released, users are quick to grab it. Overtime, songs start to pile up and they start to take up more and more hard disk storage. To tackle this, you need to clean out your iTunes library every so often in order to ensure your system is performing as it should.
Related:
How to Change Time Zone on Mac
How to Delete iTunes Library
If, instead of deleting the songs, you just want to remove their metadata, like how often you play a song or the rating you have assigned to them, then here are the steps that you can follow to do the job it:
- Exit from your iTunes application on your Mac.
- Now navigate to the Finder and click the Go button.
- After this, tap the Home button to open your MacBook’s Home Directory in a window.
- Now open the Music folder from the list, and once inside, head to the iTunes folder.
- After this, Drag and Drop the following iTunes Library.itl file into the Trash to delete your iTunes library. All of your songs will still be intact.
- After this, Hold the Control key and tap on the Trash to empty it.
- Finally, Restart your iTunes, and it will take a few seconds to generate a new library.
That’s it. You have successfully created a new library for your iTunes on Mac.
How to Reset iTunes on Mac
Like other applications, sometimes iTunes runs into various problems as well. Although there are many fixes available on the internet, they don’t work in some cases. In such a scenario, doing a reset might just do the trick and get rid of your worries.
Here are the steps that you can use to reset iTunes on Mac:
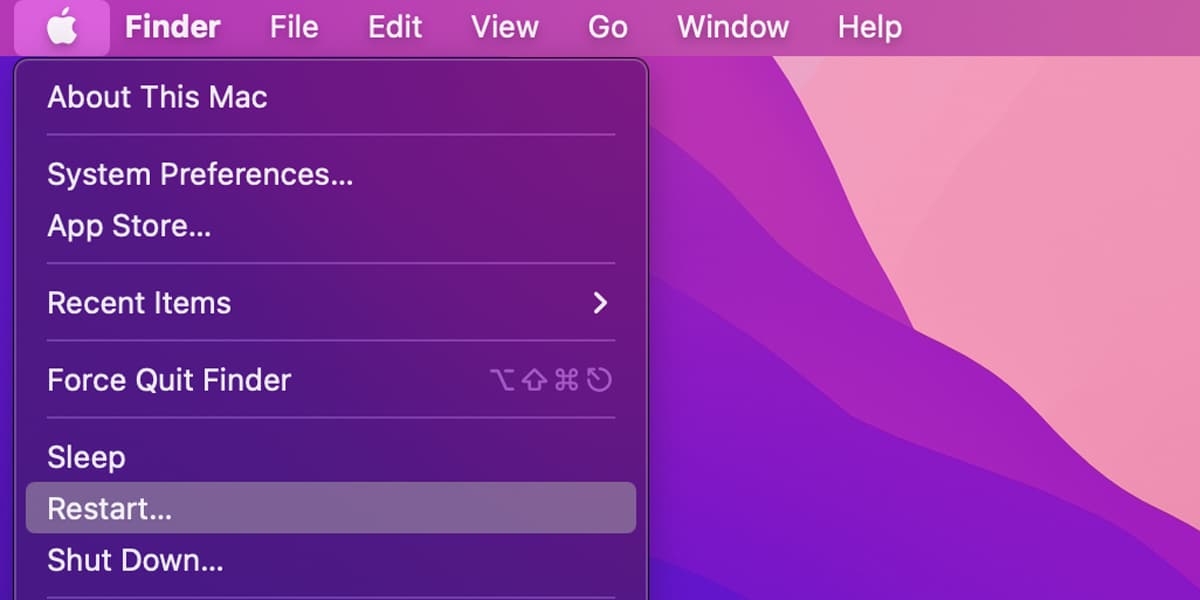
- Exit out of your iTunes application.
- Now head to the Finder, click Go, and then tap the Home option.
- After this, navigate to your Music Folder and double-click on your iTunes folder to open it.
- Once inside, delete the following iTunes Library.itl and iTunes Music Library.xml files.
- Finally, Restart your iTunes and let it create a new Library.
After following these steps, you have successfully reset your iTunes application on Mac.
How to Sync Your iPhone With a New Computer While Keeping Music
iPhones are configured only to be connected to one computer at a time, and this sync allows them to share all of their files including music with each other flawlessly. Luckily there is a way around this, and you can sync your iPhone with a new computer.
Here are the steps that you can use to sync your iPhone with a new computer while keeping your previous music intact:
- Connect your respective iPhone to the new computer you want to sync your music with and open the iTunes application if it doesn’t start automatically.
- Now, wait for the syncing message to appear on your screen. Once you see it click the Cancel button present on the popup window.
- After this, navigate to the Devices section and click on your iPhone.
- Now on the next window, tap the Summary tab, select Manually manage music and videos, and click on Ok to start syncing your content manually. Once done, click Apply.
- After this, navigate to the Library section in the left pane and click the Music tab.
- Once there, hold the Control key to select multiple non-adjacent files and hold Shift to select multiple adjacent files.
- Now, Drag all your selected files to the iPhone icon on the left of the iTunes application window under the Devices list.
- Finally, right-click on your iPhone once you are finished and tap the Eject button.
That’s it! You have successfully synced your iPhone with a new computer while keeping your music. Even though this method works perfectly, you can only use it manually to manage your video and audio files. It is extremely useful for users who like to travel a lot and can’t take their computer with them to every location.
It allows them to manually sync and transfer new music to their iPhones without losing any of their existing data.
Related:
How to Access iPod Files Without iTunes in Windows 10
How to Create, Edit and Delete Playlists on Mac
The Music app is considered to be one of the best media players as it can hold all of your audio files in one place and allows you to sync them across multiple devices. But since it can store so many files at once, there is a high chance that you will end up with a library cluttered with audio files.
Luckily to tackle this problem, the app allows users to create different playlists that can be used to store audio files according to various categories and genres. Now, if you are someone who has recently started using the Music app, let’s see how you can create, edit and delete playlists in it.
Create a Playlist
To place your audio files under a certain genre or category, you will first need to create an empty playlist. Here are the steps to get it done:
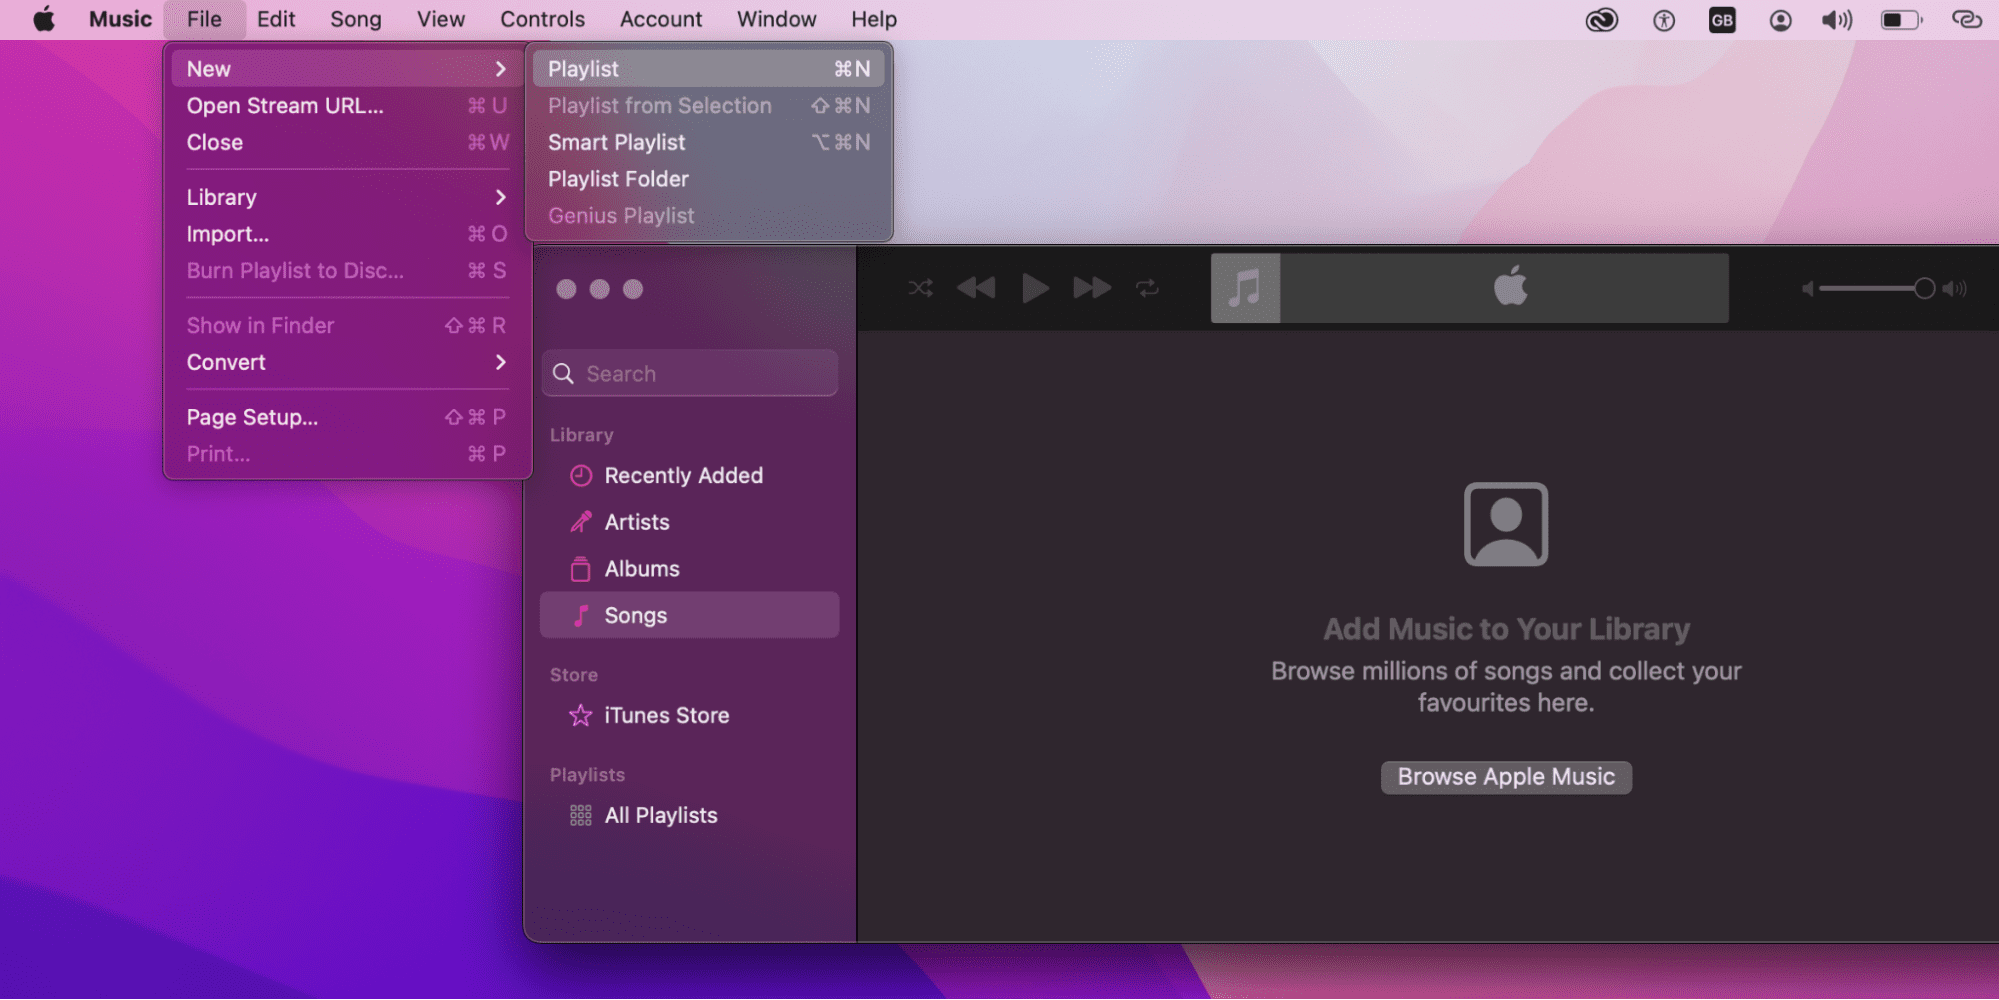
- Open the Music app on your Mac.
- Now click Choose File.
- After this, tap New and then Playlist. You should now see a new playlist on the left sidebar in the Playlists section.
- Finally, give a name to your playlist.
Once you are done naming your playlist, you need to start adding audio files to it. Here are the steps to execute it:
- Open the Music app and click Browse, Listen Now, or any other option listed below the Library section.
- After this, simply drag and drop any audio file into the respective playlist you created earlier.
That’s it, you have successfully created a new playlist.
Edit a Playlist
You can also rename, sort, and remove songs from any existing playlist on your Mac. Here’s how it can be done.
Here are the steps to rename your respective playlist:
- Open your Music app and navigate to the respective playlist using the Sidebar.
- Now tap the playlist name present at the top of the window.
- Finally, enter the new name and hit the Return key.
Here’s how you can sort the audio files within your respective playlist:
- Open the Music app and head to your respective playlist.
- Now click Choose View and then Sort By.
- After this, click Playlist Order and drag to reorder audio files according to your needs.
To remove songs from your respective playlist, follow these steps:
- Navigate to the Music app and tap your respective playlist from the Sidebar.
- After this, select the relevant audio files and hit the Delete key.
Delete a Playlist
In case you want to get rid of any existing playlist, here are the steps that you can use to execute it:
- Head to the Music app.
- Now select the respective playlist that you want to delete via the Sidebar.
- Now either hit the Delete key or hold Control and click the respective playlist.
- Finally, click Delete on the confirmation window.
After following these steps, you have successfully deleted the respective playlist from your Music app.