
Downloading each iPhone photo to Mac will take twice the space, and the greater the number of photos, the quicker you will run out of storage. So, what’s the solution? How can you access and view iPhone photos on Mac without importing them?
Well, you can enable iCloud photos on both your iPhone and Mac. If you don’t know how to do so, then worry not, because in this guide, we will walk you through the steps to enable iCloud photos, this way, you can view your iPhone photos on your Mac without importing them.
Let’s get started.
What is iCloud Photos
When it comes to keeping users in the ecosystem, Apple always takes the crown, and iCloud Photos is the best example of it.
iCloud Photos is a great library to store your photos and videos. If you have iCloud photos enabled on all of your devices, then your entire photo library will be synced throughout your devices.
Every photo you take will be available on your devices and every edit you make will be synced. You can share your photos with your family and friends using iCloud Photo Sharing. You can create a shared album, and have your family and friends add their photos and videos to that album.
Use iCloud Photos to View iPhone Photos on Mac without Importing
If these features aren’t enough, you can also use iCloud Photos to save a ton of space. For instance, if you took a lot of photos with your iPhone, and now you want to look at them on your Mac, then you don’t have to download those pictures, instead, you can use iCloud Photos to view iPhone photos on Mac without importing them. You just have to:
- Enable iCloud Photos on iPhone
- Enable iCloud Photos on Mac
How to Enable iCloud Photos on iPhone
Since iCloud syncs your photos throughout the Apple devices, you need to enable it on iPhone and Mac. Here’s how you can enable iCloud photos on iPhone:
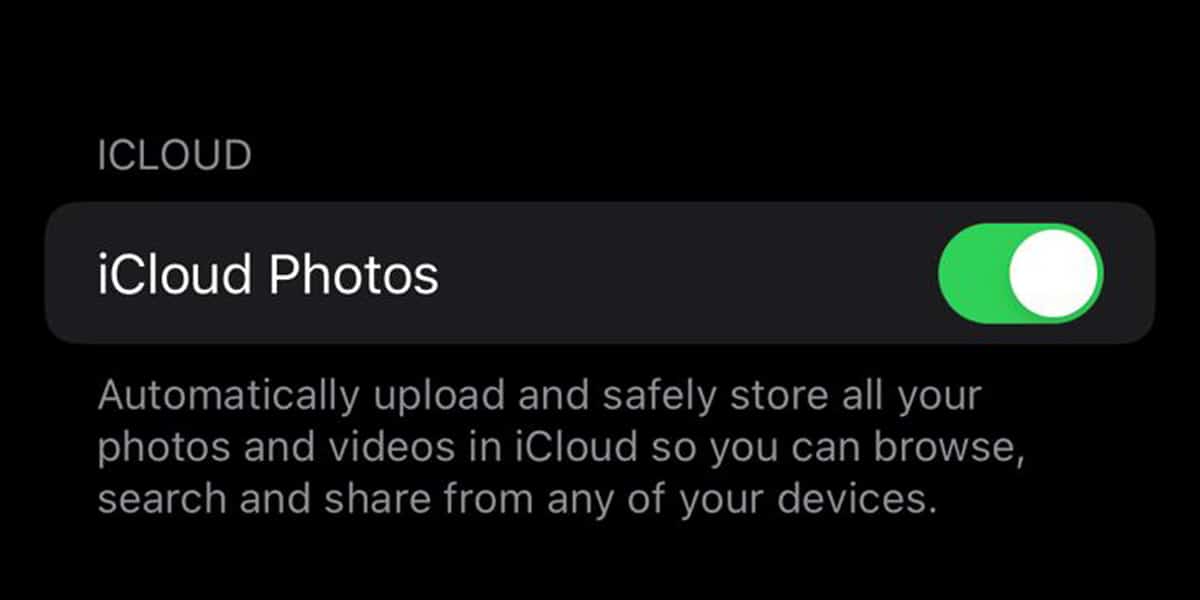
- Tap on the Settings app from the homescreen. It has a gray icon with gears on it.
- At the top of the Settings app, tap on your Name.
- Tap on iCloud.
- Tap on Photos.
- Toggle the iCloud Photos option.
That’s it. Now all the photos and videos in your iPhone’s Photos app will be synced with iCloud. The syncing can take hours, days, and even weeks depending on your Internet speed and the amount of photos.
If there were any photos and videos already synced with iCloud from another device, they will be available on your iPhone. Head over to the Photos app on your iPhone and tap on Library. Here you can view all the photos and videos stored in iCloud Photos.
Related:
How to Clear Clipboard On Mac
How to Enable iCloud Photos on Mac
Now that iCloud Photos is enabled on your iPhone, and it is synced with your entire Photos library, you can enable iCloud Photos on your Mac to view those photos without importing them. Here’s how:
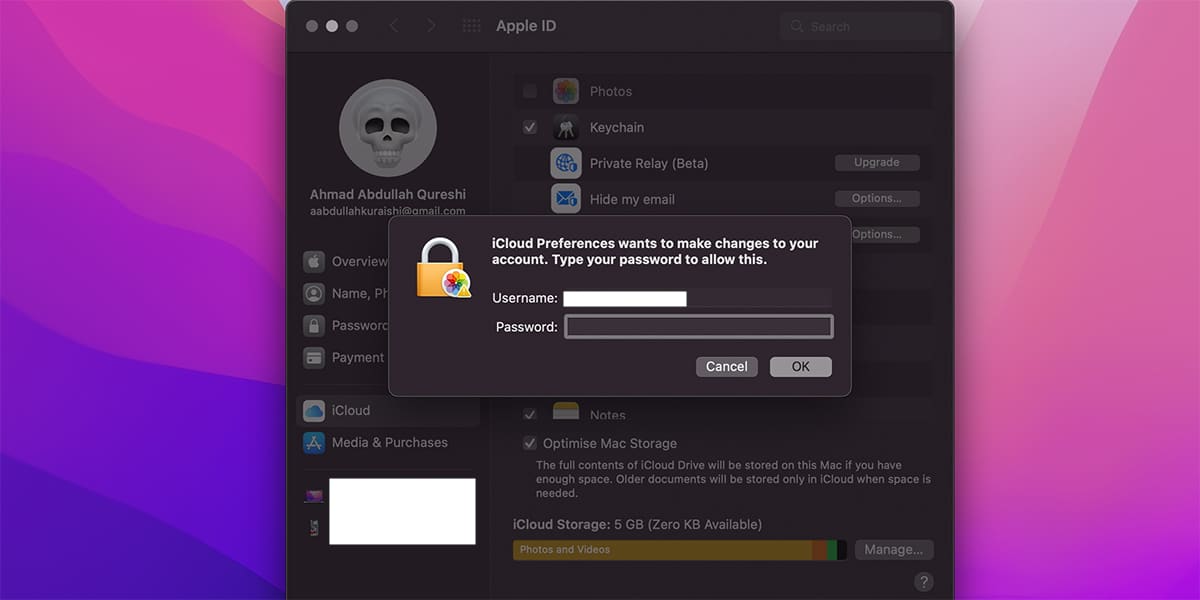
- Click on the Apple icon on the top-left corner of our screen.
- Select System Preferences from the drop-down menu.
- In the System Preferences window, click on Apple ID. You can also search for it using the search bar.
- Once you are in the Apple ID preferences, click on iCloud from the sidebar.
- Click on Photos and enter your administrator password if asked.
- Click on the Options button.
- Select iCloud Photos.
After following these steps, iCloud Photos will be enabled on your Mac. If you don’t see the Options button on step 6, then:
- Open the Photos app from the Dock. You can also open it from the Launchpad.
- Click on Photos on the menu bar.
- Select Preferences from the drop-down menu.
- Click on iCloud.
- Make sure the iCloud Photos option is marked.
- Select the Download Originals to this Mac option if you have plenty of storage on your Mac.
View iPhone Photos on your Mac
Once iCloud Photos is enabled on your Mac, you can use it to view your iPhone’s photos without downloading them. Just follow along:
- Open the Photos app from the Dock. You can also open it from the Launchpad.
- Click on Photos on the sidebar
- Now all the photos and videos you see are the ones uploaded on iCloud Photos. These photos are synced from your iPhone, and you don’t have to download them to your Mac.
How to Export Photos and Videos from iCloud
Once you view your iCloud Photos on the Mac, you may want to edit them as well. For that, you need to download those photos and videos from your iCloud to your Mac. You can do so by following these steps:
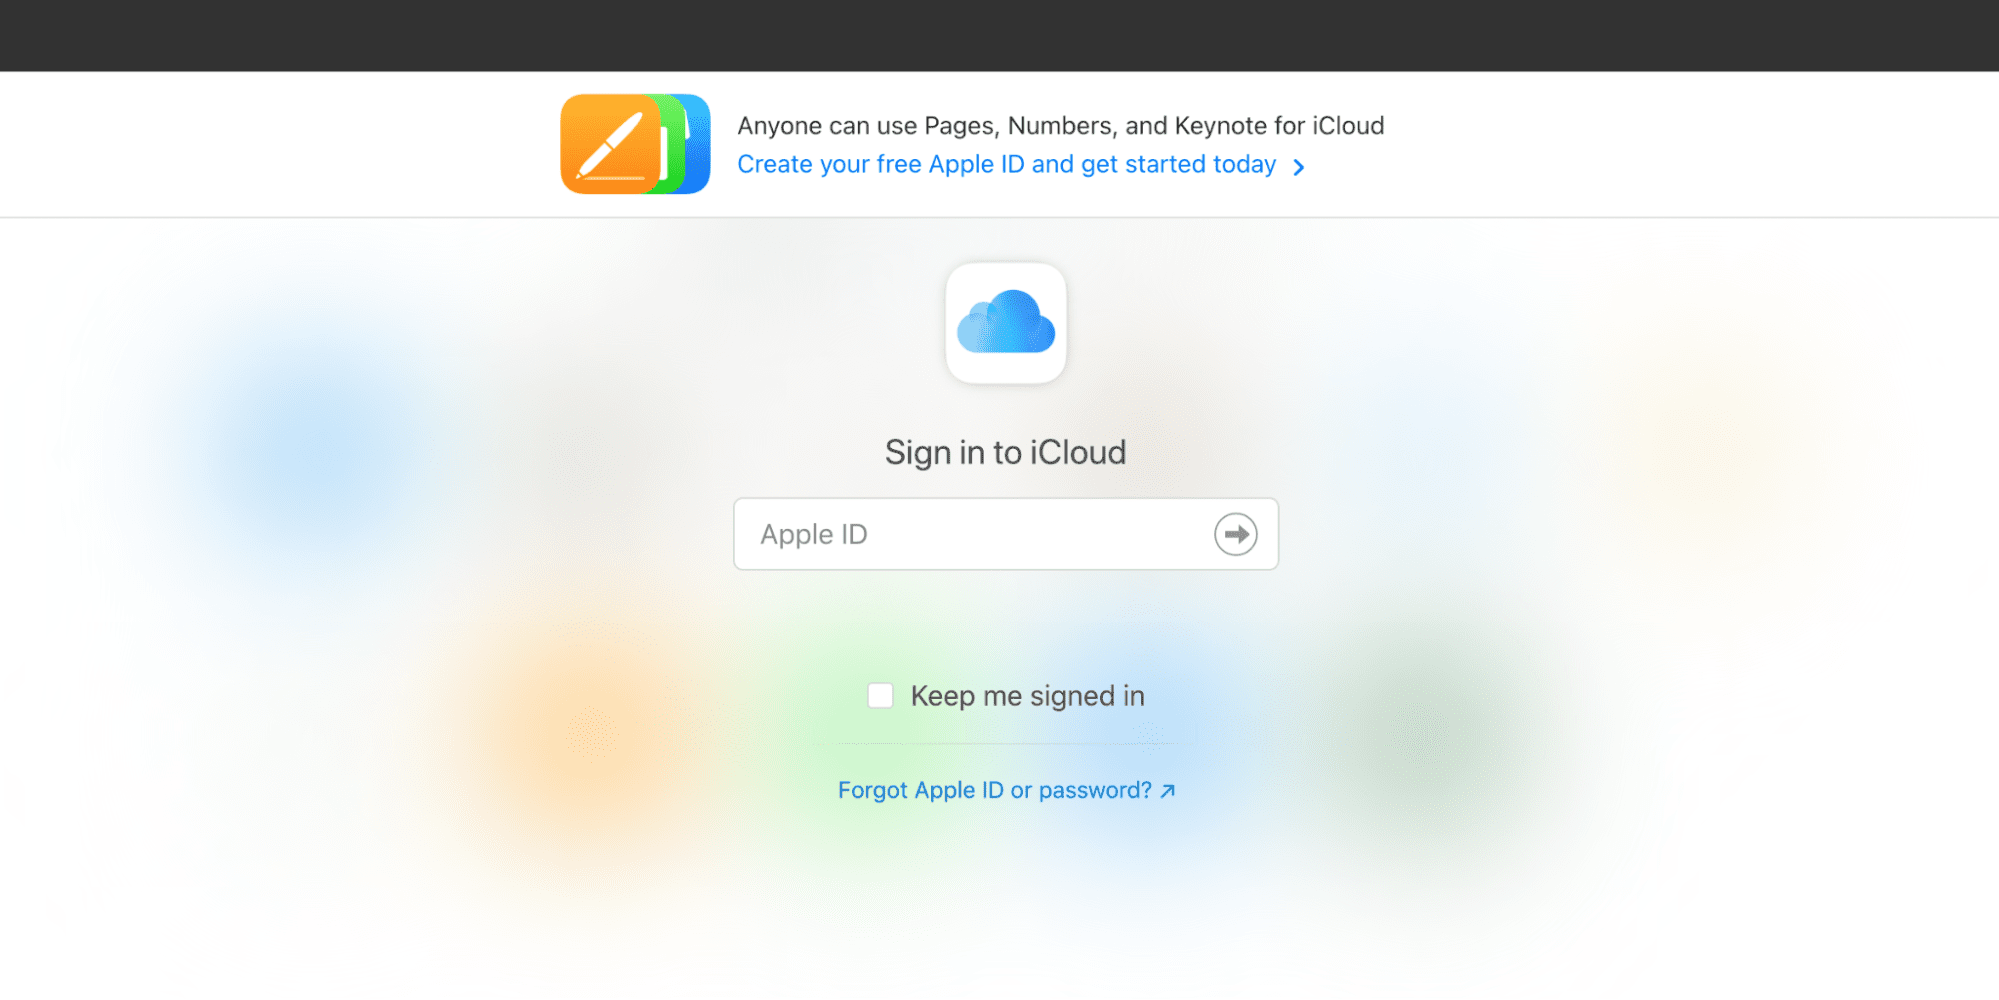
- Head over to iCloud’s website from Safari.
- Sign into iCloud with your Apple ID.
- Click on Photos.
- Select the photo or video that you want to download. You can also select multiple photos and videos by holding the Command key,
- On the top-right corner of the window, click on the Download button.
- If you want to download the original image as captured or imported, then click and hold the download button and select Unmodified Original.
- Finally, click on Download.
How to Save Storage with iCloud Photos
Save iPhone Storage
Other than the seamlessly integrated syncing capabilities, iCloud Photos also gives you the option to save your iPhone storage with a feature called Optimize iPhone Storage.
With Optimize iPhone Storage enabled, all of your high-resolution photos and videos will be kept in iCloud in their original formats, while the space-saving versions will be stored on your iPhone.
For instance, if you recorded a 4K video with your iPhone, then it will be uploaded to your iCloud in the 4K format, while a 1080p version will be stored on your iPhone to save space.
Optimize iPhone Storage is turned on by default. However, you can still enable it by following these steps:
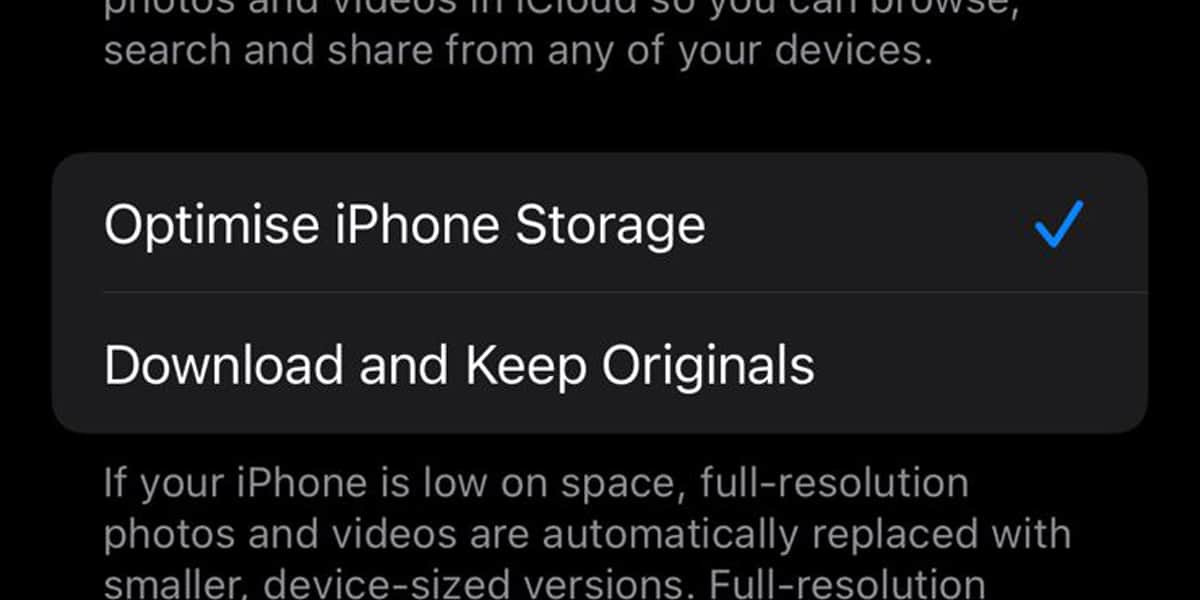
- Tap on the Settings app from the homescreen. It has a gray icon with gears on it.
- At the top of the Settings app, tap on your Name.
- Tap on iCloud.
- Tap on Photos.
- Toggle the Optimize iPhone Storage option.
If you have plenty of storage and you don’t want to store your photos and videos at an inferior quality, then you can disable Optimize iPhone Storage by following the steps we have discussed above.
Save Mac Storage
Similarly, you can enable Optimize Mac Storage on your Mac. It serves the same purpose as Optimize iPhone Storage. Here’s how you can enable it:
- Open the Photos app from the Dock. You can also open it from the Launchpad.
- Click on Photos on the menu bar.
- Select Preferences from the drop-down menu.
- Click on iCloud.
- Select the Optimize Mac Storage option.
If you don’t want to save storage, then you can select the Download Originals to this Mac option instead.
Related:
How to Turn Off Time Machine on Mac
How to Upgrade iCloud Storage
By default, iCloud comes with 5GB of free storage that you can use to store your photos, videos, files, and backups. However, this 5GB storage will run out quickly if you use iCloud regularly. That’s why you need to upgrade to iCloud+ for bigger storage and additional features.
iCloud+, Apple’s premium cloud subscription service, offers more storage for your files combined with features like Hide My Email, iCloud Private Relay, and HomeKit Secure Video support. iCloud+ offers three plans, you can choose between 50GB, 200GB, and 2TB storage.
If you choose the 50GB plan, then you will get the HomeKit Secure Video support for one camera, the 200GB plan comes with support for up to five cameras, while the 2TB plan comes with support for unlimited cameras.
All three plans allow you to share everything with up to five other family members. You can upgrade to iCloud+ from your iPhone or your Mac.
Upgrade to iCloud+ from your iPhone
- Tap on the Settings app from the homescreen. It has a gray icon with gears on it.
- At the top of the Settings app, tap on your Name.
- Tap on iCloud.
- Select Manage Storage or iCloud Storage.
- In the next page, tap on Buy More Storage or Upgrade.
- Tap See Other Plans, and select a plan according to your preferences.
- Tap on Upgrade to iCloud+ or Buy.
- Sign-in with your Apple ID.
- Enter your payment information and follow the on-screen instructions.
That’s it, now your iCloud storage will be upgraded and you can continue storing your files.
Upgrade to iCloud+ from your Mac
Similarly, you can also upgrade to iCloud+ from your Mac. Just follow along:
- Click on the Apple icon on the top-left corner of our screen.
- Select System Preferences from the drop-down menu.
- In the System Preferences window, click on Apple ID. You can also search for it using the search bar.
- Once you are in the Apple ID preferences, click on iCloud from the sidebar.
- Click on Manage in the bottom-right corner of the window.
- Click on Buy More Storage or Change Storage Plan.
- Choose a plan and click on Next.
- Sign-in with your Apple ID.
- Enter your payment information and follow the on-screen instructions.