
When it comes to quickly and easily navigating the files and folders, nothing provides as much accessibility as the Finder. The Finder sidebar consists of various sections that you can use to organize your files. For instance, you can tag particular folders and they will appear under the Tag section.
Similarly, you can add your favorite files and folders (files you access frequently) to the Favorites section and you can access them with just a click of the button. In this guide, we will walk you through the two ways to add folder to Favorites on Mac.
Let’s get started.
Add Favorites Section on the Sidebar
Before you start adding files and folders to the Favorites section, you need to make sure Favorites itself is visible on the sidebar. Open a new Finder window by pressing the Command + N keys and look for Favorites in the sidebar.
If the section is visible, then ignore these steps. If not, then here’s how you can add it to the sidebar:
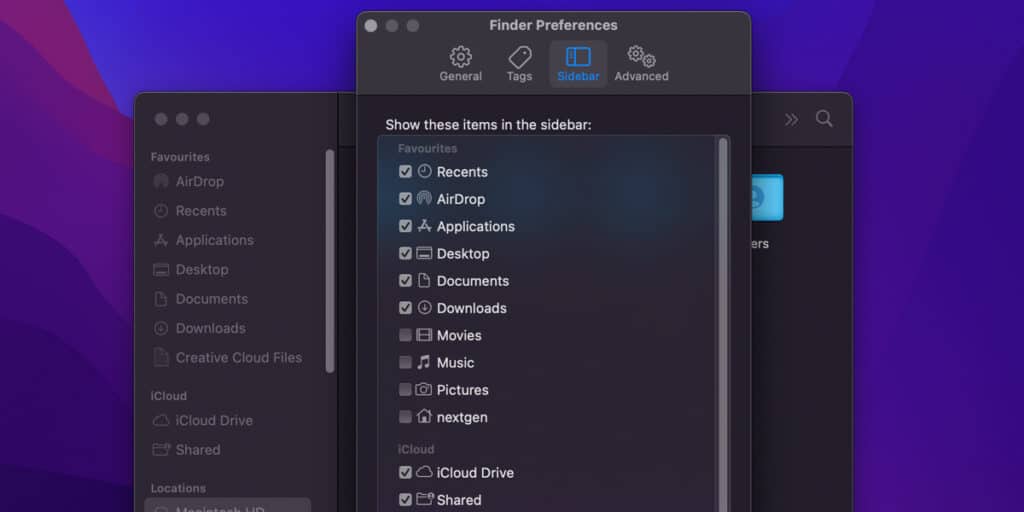
- First of all, click on the Finder menu on the top-left corner of your screen.
- From the drop-down menu, select Preferences.
- In the Finder Preferences window, head over to the Sidebar tab.
- Under the Favorites section, mark at least one of the items to make the Favorites section visible on the sidebar of the Finder.
Once the Favorites section is visible on the sidebar, you can start adding folders to it.
Ways to Add Folder to Favorites on Mac
1. Using the Finder Menu
You can use the Finder menu to add a folder to Favorites. Here’s how:
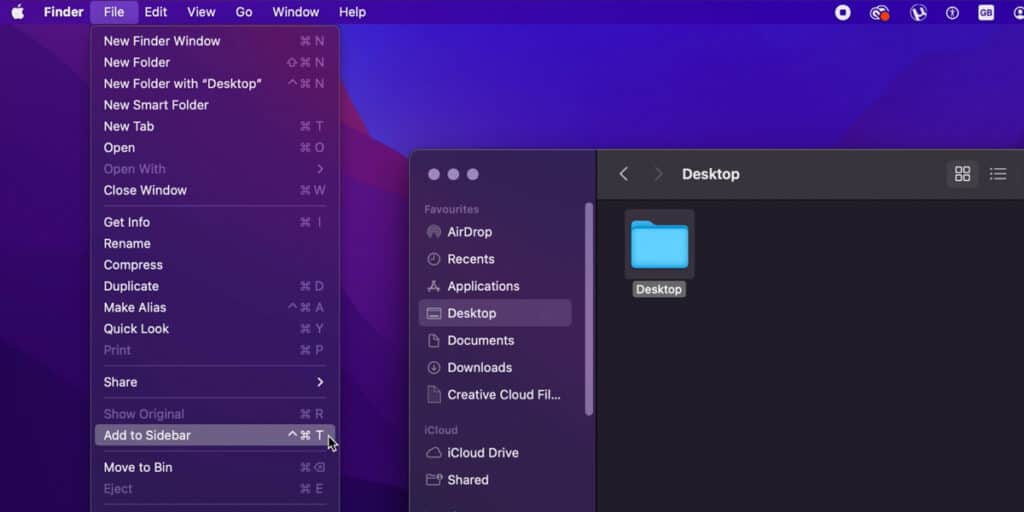
- Launch the Finder from the dock or open a new Finder window by pressing the Command + N keys.
- Navigate to the folder you want to add to Favorites.
- Select the folder.
- On the toolbar, click on File.
- Select Add to Sidebar.
That’s it, the folder you selected will appear under the Favorites section. From now on, you don’t have to navigate to the folder every time you want to open it, instead, you can just click on it from the Favorites section and it will open.
Related:
How to Stop Dictionary From Popping Up on Mac
2. Using the Drag and Drop Method
If, for some reason, the Finder menu does not work for you, then you can also use the drag and drop method to add a folder to Favorites. This method is even simpler than the one above, and it will definitely work for you.
Here’s how you can use the drag and drop method to add a folder to Favorites:
- Launch the Finder from the dock or open a new Finder window by pressing the Command + N keys.
- Navigate to the folder you want to add to Favorites.
- Select the folder, and drag it to the Favorites section on the sidebar by holding the left mouse button.
- Once it is in the Favorites section, drop it by releasing the left mouse button.
Now the folder will remain under the Favorites section and you can access it from there.
How to Remove a Folder from Favorites

Removing a folder from Favorites is just as simple as adding it. You may want to do it if you don’t use that folder anymore. Here’s how:
- Launch the Finder from the dock or open a new Finder window by pressing the Command + N keys.
- Right-click on the folder you want to remove in Favorites.
- Click on Remove from Sidebar from the drop-down menu.
Now the folder will be removed from the Favorites section. Remember, removing a folder from the sidebar does not delete it from its original location. It only deletes the shortcut.
Similar to adding a folder to Favorites, you can also remove it by using drag and drop method. Simply hold the folder you want to remove, and drag it out of the Favorites section. Drop it when you see the small remove icon. The folder will disappear in a puff of smoke.
How to Change Views in the Finder
The main purpose of adding files and folders to the sidebar is to improve efficiency. But this is not the only feature that the Finder provides, it also gives you the option to change the views of particular folders to streamline your workflow.
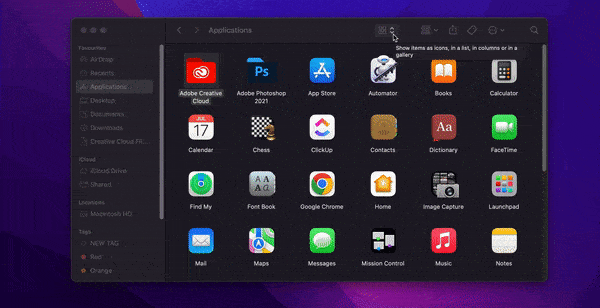
Finder provides you four ways to view items — Icon, List, Column, or Gallery. You can switch between all four of them according to your preferences.
Icon View
Icon view focuses on the icons of the files. It is useful when you’re trying to look for a file by its icon.
To switch to Icon View, click on the left-most icon in the Views section. It is the one with six small circles.
List View
List view shows the files in a list format. It provides a detailed view of the files by showing you the File Kind, Date Last Opened, and much more. You can also click on the column headers to change the sorting order of the files. For instance, click on the Date Modified header and all the files will be sorted by that.
To switch to List View, click on the icon next to the Icon view. It has four parallel lines on it.
Column View
As the name suggests, Column view shows the files in a column. This view is great when you want to look over the directory of the files as well as its preview. The left-most column will have the parent directory, and the right-most column will have a preview of the file. The middle columns display the path folders in the list view.
To switch to Column View, click on the third icon from the left in the Views section. It has three tiny columns on it.
Gallery view
If you are looking for a specific picture in a folder full of pictures, then you should switch to Gallery View. It allows you to preview an image without opening it. Simply select a picture, and you’ll see an enlarged preview in the window, while the rest of the pictures are shown as a thumbnail strip below. You can also navigate between the pictures with the right and left arrow keys.
To switch to Gallery View, click on the right-most icon in the Views section.
You can also switch between the four views by selecting View > View as from the toolbar.
Related:
How to Get Rid of Sidebar On Mac
How to Customize Views in the Finder
Once you have settled on a view, you can further customize it according to your liking. For instance, to set a default view for a particular folder, follow these steps:
- Click on View in the toolbar.
- Select Show View Options from the drop-down menu.
- Select the Always open in button.
- You can select the Browse in option and all the subfolders will also have the same view.
If the subfolders are not opening in their parent folder’s view, then open the Show View Options in that subfolder, and deselect the Always open in and Browse in options. These options must only be selected for the parent folder and not the subfolders.
Below them are two drop-down menus for Group By and Sort By, you can select how the items are arranged in groups and sorted from there. Group By option is not available in Gallery view.
Customize Icon View
To further improve your work flow’s efficiency, you can change the icon size, the space between them, and much more as well. Here’s how:
- Make sure the Icon view is selected by following the steps above.
- Click on View in the toolbar.
- Select Show View Options from the drop-down menu.
- Drag the Icon size slider to change the icon size.
- Similarly, drag the Grid spacing slider to change the space between icons.
- You can also select the position and font size for item labels.
- Mark the Show item info and Show icon preview checkboxes to show info like number of items in a folder and file size.
- Below that, you can select the window background as Default, Color, or a Picture.
- Lastly, you can click on the Use as Defaults so all the folders that use Icon view will have the same customizations.
Customize List View
Just like Icon view, you can also customize List view. Here’s how:
- Make sure the List view is selected, and head over to View > Show View Options from the toolbar.
- From there, you have some common features that were also in Icon view like Text size, Icon size, Show icon preview, and Use as Defaults.
- Under Show Columns, you can mark the columns you want to appear in the window.
- Mark the Use relative dates option to display relative dates like “Yesterday” or “Today”.
Customize Column View
Unlike Icon and List view, Column view does not come with many customizations. You can mark the Show preview column option so the preview of a selected item will be shown in a separate column.
Column view also does not have the Use as Defaults option.
Customize Gallery View
One useful customization that is available for Gallery view is that you can change the Thumbnail size. From small and medium to large, just select whichever one you want. Other than that, the common options like Show preview column and Use as Defaults are available.