
If anyone has remote access to the registry files on your computer, you should immediately remove that access to save your time from a big headache. Also, Whenever you do any changes to your registry file, you should back up them to make sure you don’t fall into any problem. Continue reading to know “How to Disable Network Access to Windows Registry”
Windows has the option to disable remote access to the Windows registry. Firstly, you should have administrator access to disable network access to Windows registry.
What is Windows Registry?
The windows registry is a database that is available on your computer hard drive. It stores the important files and settings related to the windows and the applications. The registry should be only edited by the person who knows about the registry properly otherwise, you will have problems with your computer.
When a person knows about the registry, he can do amazing things with the computer. He can increase the performance of the computer and customize the window according to his needs. Also, you can speed up your computer’s performance using the Windows registry.
Why we should Disable Network Access to Windows Registry?
It is not necessary to disable network access to Windows registry. But to be on the safe side you should disable it before someone mess up with the registry files. If you are in a network and any person have the access to registry files then they don’t need your computer to edit the files. Therefore, you should disable it.
How to Disable Network Access To Windows Registry
We will disable it without touching the registry files. There are two ways to disable network access to the Windows registry. All the windows have the same method to disable network access to Windows registry.
Before heading towards our first method, you should set up a system Restore Point. This will help you if you got any errors during the process. Watch this video by EasyPcRepairs to set up the system restore point.
After setting up the system restore point, let’s begin with our first method to disable access to the windows registry.
First Method: Edit Settings in Services
By disabling the services, the remote access to registry files will be disabled. The method looks complicated but in reality, it is not. It is an easy and fast method to follow. Even the non-techy person can easily do this.
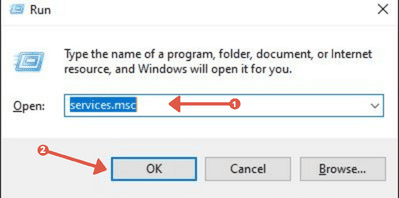
Open the Run command by pressing the Windows + R button together. Type “services.msc” in the field and press OK. A new window will open and you will see a list of files.
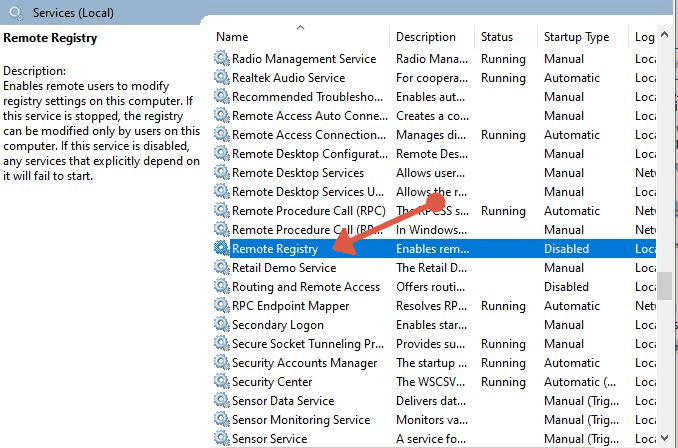
Find the Remote Registry in the list of files. By pressing the R button you will see all the files starting with the R letter. This makes it easier to find windows registry files from the list.
Double click on the remote registry and in the General tab you will see a dropdown named “Startup Type”. Click on it and select Disabled from the menu.
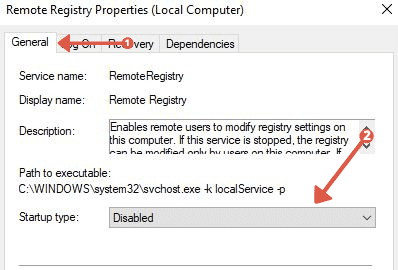
Click Apply and restart your computer.
Now the remote users cannot edit your registry files. Also, you can revert these settings to manual and automatic, if you want to enable remote users to edit the registry files.
Related:
How to Access iPod Files Without iTunes in Windows 10
Second Method: Use Registry
The second method is almost the same as the first method. But in this method, you need a registry editor to edit the registry itself. By default, it is available on your pc.
Reminder: Please create a system restore point if you have not created it yet. The method to create a system restore point is shown in the above video.
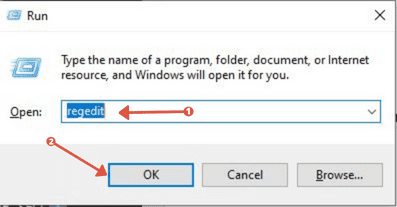
Open the Run by pressing the Windows + R button together. Type “regedit” in the text field and click on the OK button. Choose yes if it asks for permission.
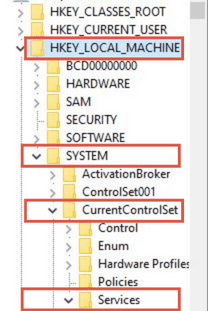
You will see multiple folders in the new window. From the folder navigate using the arrow left to the folder names to the HKEY_LOCAL_MACHINE → SYSTEM → CurrentControlSet → Services → RemoteRegistry.
Double click on the Start entry with REG_DWORD.
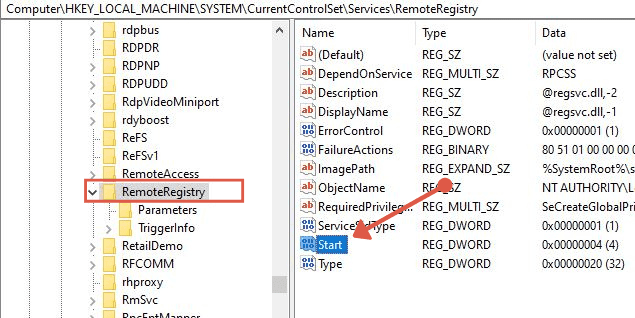
You will see a typeable field with the value data. Delete the default number and enter 4 in the field. Click on the OK field and restart your computer.
This will disable network access to the Windows registry. If you want to reverse the process, you can simply enter a different value.
- 2 = Automatic
- 3 = Manual
- 4 = Disabled
We hope that this guide will help you to Disable network Access to Windows Registry.